

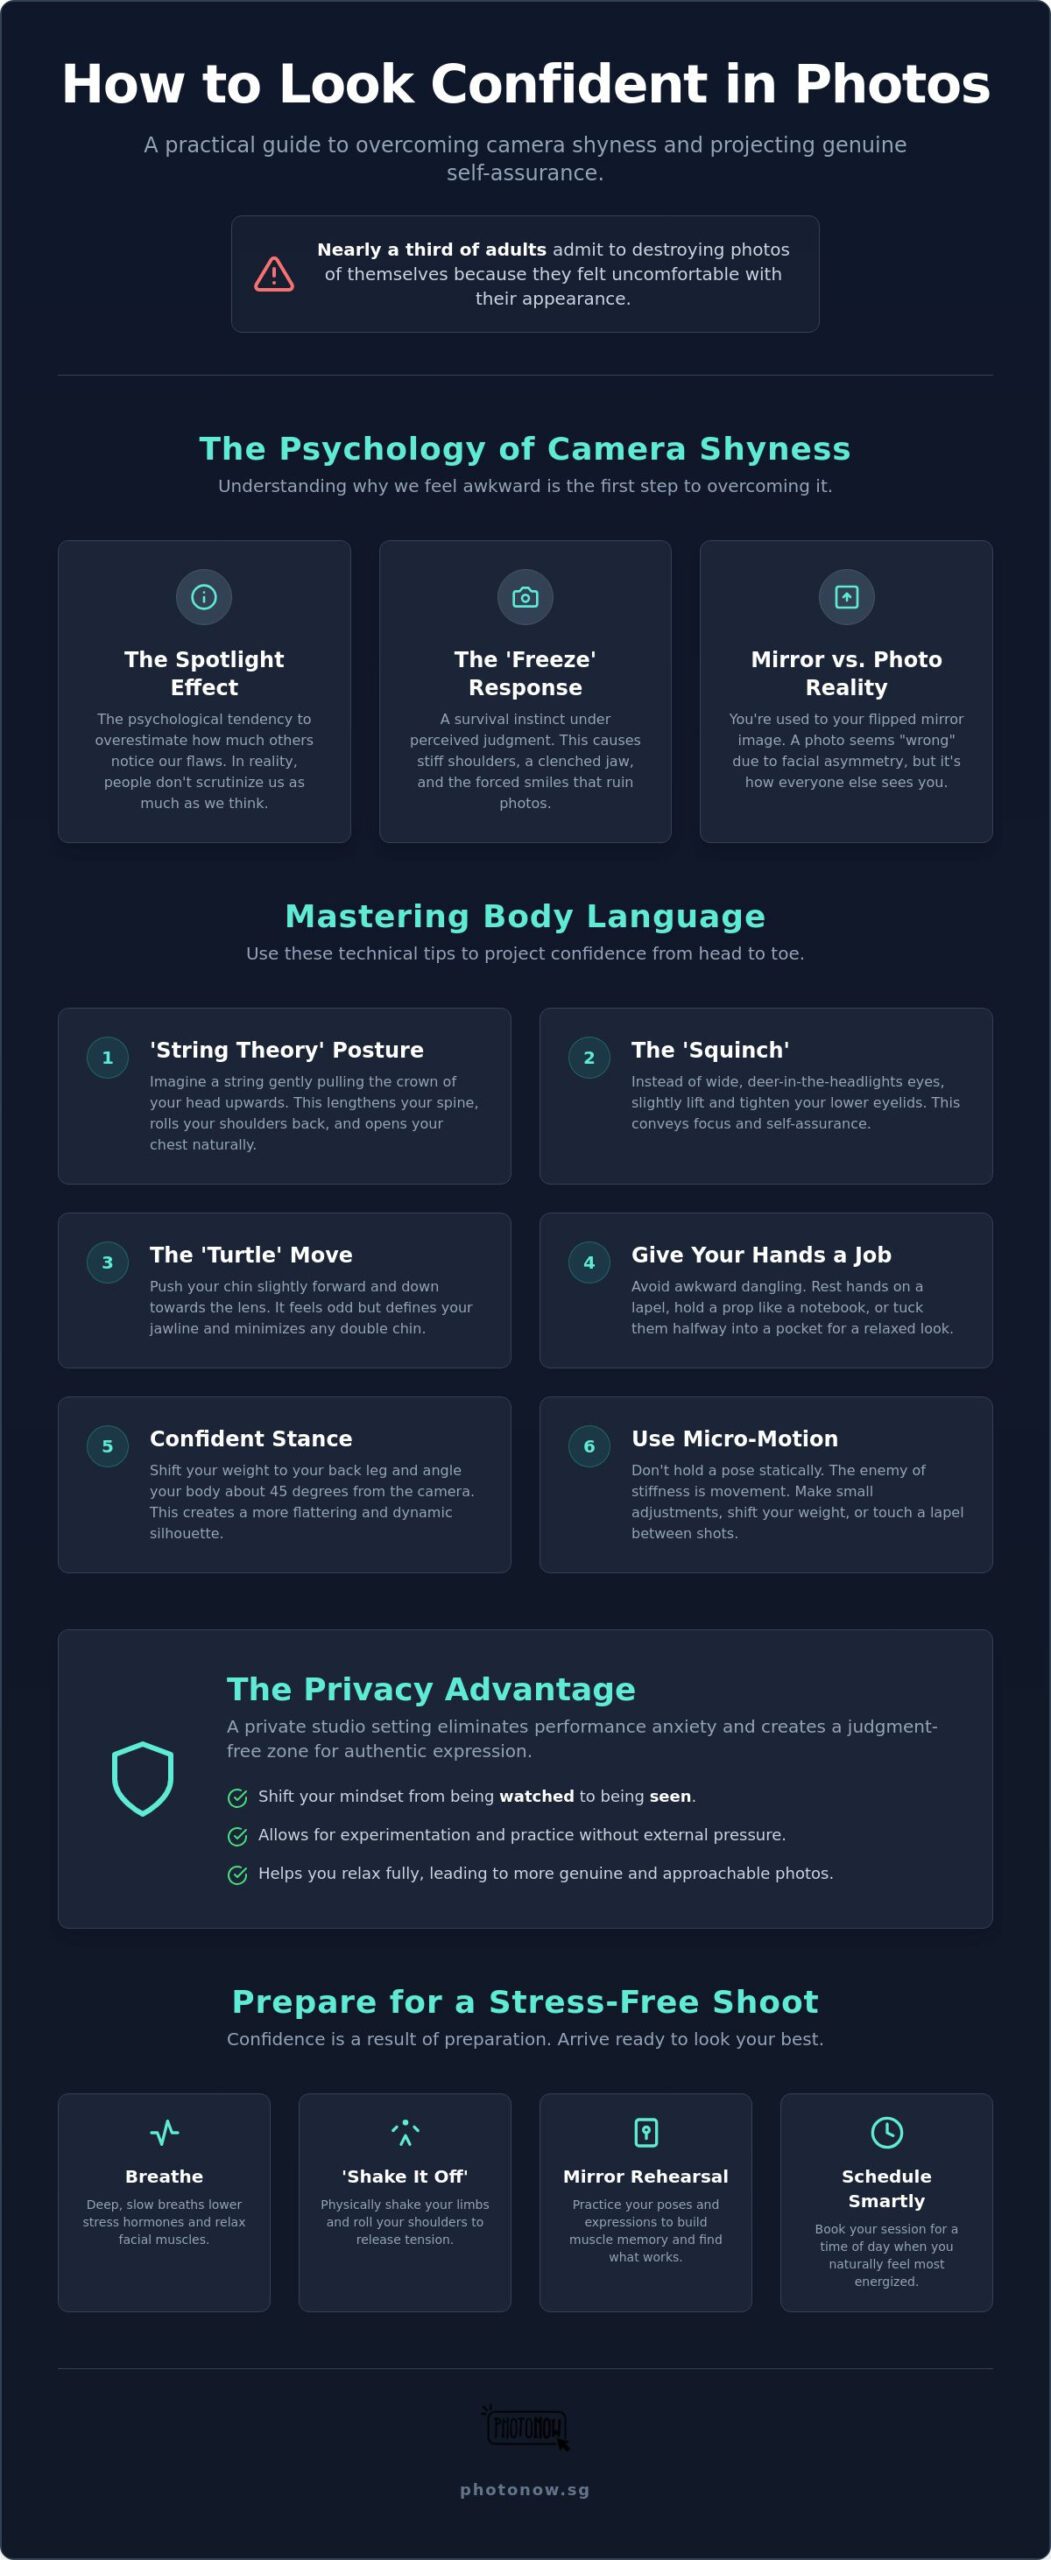
Did you know that nearly a third of adults have admitted to destroying a photograph or stopping one from being taken because they felt uncomfortable with their appearance? It’s a common struggle that many professionals face, especially when trying to figure out how to look confident in photos for a corporate headshot or a personal branding session. You aren’t alone if you’ve ever felt unphotogenic or found yourself suddenly forgetting what to do with your hands the moment a camera appears. Most people experience some form of lens paralysis, feeling stiff and worried about being judged during their session.
Projecting authority and warmth isn’t a personality trait you’re born with; it’s a technical result of privacy, posture, and preparation. This guide explores the psychological and technical secrets to projecting genuine confidence in every shot. We’ll cover everything from simple go-to poses that eliminate stiffness to the ways a private studio environment can help you relax. By the end of this article, you’ll have a clear roadmap to feeling at ease and looking your best, whether you’re updating your LinkedIn profile or capturing a graduation milestone.
Key Takeaways
- Understand the psychology behind camera shyness and how to shift your perspective from being watched to being seen.
- Learn how to look confident in photos by applying technical posture adjustments like “String Theory” and the “Squinch” for more expressive eyes.
- Explore the benefits of a private studio setting to eliminate performance anxiety and allow for a more authentic, judgment-free experience.
- Identify specific posing strategies for business contexts that project both professional authority and approachable expertise.
- Prepare for success with practical tips on timing and mirror rehearsals to ensure you feel energized and ready for your session.
The Psychology of Camera Shyness: Why We Feel Awkward
When a camera lens is pointed in your direction, it often feels less like a tool for art and more like a critical eye. This sensation is known as the Spotlight Effect. It is a psychological phenomenon where we overestimate how much others notice our flaws or mistakes. In a studio setting, this feeling is magnified because the camera acts as a non-responsive listener. It doesn’t give you the social cues or smiles that a human would, which often leaves you wondering how to look confident in photos when you feel anything but relaxed.
The “freeze” response is a common side effect of this perceived judgment. When we feel under pressure, our bodies naturally tense up as a survival instinct. This leads to the stiff shoulders, clenched jaws, and forced smiles that ruin otherwise perfect shots. It’s helpful to remember that being photogenic isn’t a genetic trait you’re born with; it is a skill rooted in the ability to relax. By understanding the fundamentals of body language, you can learn to override these primitive instincts and project an image of ease and authority.
Mirror Image vs. Photographic Reality
Most people feel a sense of discomfort when looking at a photo of themselves because it looks “wrong” compared to what they see in the mirror. This happens because of the Mere-Exposure Effect. You are used to seeing a flipped version of your face every morning. Because human faces are naturally asymmetrical, the photographic version of you looks unfamiliar to your brain. While you might focus on a slightly lower eyebrow or a tilted lip, others don’t notice these details because they see your photographic self every day. Mentally bridging this gap involves accepting that your mirror self is the exception, not the rule.
Breaking the ‘Freeze’ Response
To stop the freeze response before it starts, you must focus on physical resets. Breathing is your most effective tool. Taking a slow, deep breath into your diaphragm lowers cortisol levels and signals to your brain that you aren’t in danger. This immediately softens the muscles around your eyes and mouth, making your expression appear more genuine.
Another professional trick is the “shake it off” method. If you feel yourself becoming a statue, take a moment to literally shake your hands or roll your shoulders between frames. Movement is the enemy of stiffness. Instead of holding a single position until it feels like a chore, keep your body in a state of micro-motion. Shifting your weight or adjusting a lapel creates a sense of life in the frame that a static pose simply cannot match.
Mastering Body Language: Technical Tips for Instant Confidence
Facial expressions require a similar level of technical intent. Wide eyes can often project a sense of fear or surprise, which isn’t the goal for a professional portrait. Instead, try the “Squinch”. This technique involves slightly lifting and tightening your lower eyelids. It conveys a sense of focus and self-assurance that a wide-eyed stare lacks. To complement this, define your jawline using the “turtle” move. This involves pushing your chin slightly forward and down toward the camera. It might feel strange in the moment, but it effectively eliminates the appearance of a double chin and sharpens your facial structure for the lens.
Your hands are often the biggest source of awkwardness during a shoot. The best solution is to give them a job. Whether they are lightly resting on a blazer lapel, holding a prop, or tucked halfway into a pocket, having a specific purpose prevents them from dangling aimlessly. Practicing these technical cues in a private studio environment allows you to see what works best for your unique features without any external pressure.
The Power of the Micro-Adjustment
Small shifts in your stance can lead to dramatic improvements in the final result. Instead of standing flat-footed, shift your weight to your back leg. This creates a more relaxed, asymmetrical silhouette that feels approachable. You should also angle your body approximately 45 degrees away from the lens. This creates a sense of depth and a more flattering profile than facing the camera head-on. Remember the “soft hands” rule: keep your fingers relaxed and slightly curved to avoid looking like you’re clenching a fist.
Eye Contact and Facial Tension
Where you look determines the mood of the photograph. While direct eye contact with the lens is powerful for headshots, looking slightly above or below the glass can create a more contemplative or lifestyle-oriented feel. If you struggle with a forced smile, try pressing your tongue against the roof of your mouth. This trick tightens the muscles under your jaw and prevents a “gummy” smile. Focus on micro-expressions, such as a slight lift of one corner of the mouth, to appear both authoritative and genuinely expert.
The Self-Photo Advantage: Privacy as a Confidence Booster
Traditional photography often relies on the rapport between a subject and a photographer. While professionals are trained to guide you, the mere presence of a stranger can trigger significant performance anxiety. This often results in a “performance” version of yourself rather than a genuine one. If you’re learning how to look confident in photos, the pressure of a critical eye can be a major hurdle. This is where the concept of a self photo studio singapore becomes a game changer. It transforms the professional studio into a private rehearsal space where you’re the only one in the room.
In this setting, the technology is designed to facilitate your comfort rather than dictate it. You hold a remote shutter, giving you total control over the pacing and the exact moment the camera clicks. There’s no need to wait for a photographer’s cue or worry that they’ve caught you mid-blink. Additionally, real-time monitors provide instant feedback. You can see your posture and expression immediately after each shot, allowing you to make small adjustments on the fly. This loop of action and observation is the fastest way to master your angles and internalize what confidence looks like for you.
Eliminating the ‘Judgment’ Factor
Psychological freedom is the greatest benefit of a private room. When you’re alone, you feel safe to try “silly” poses or exaggerated expressions that often lead to the most genuine smiles. Being your own director removes the fear of being judged for not knowing exactly what to do. Starting with a basic self-photo package is an excellent way to build camera confidence in a low-stakes environment. It allows you to practice technical tips without the stress of an audience, ensuring your final images look natural and poised.
Pacing Your Session
Traditional shoots can feel rushed, especially if you’re worried about wasting a professional’s time. Self-photo studios allow for intentional pauses. You can step away, check your hair, or simply take a breath to reset your facial muscles. Because you aren’t performing for anyone else, the process is incredibly efficient. Many people find that 15 minutes of private shooting yields more authentic, usable shots than an hour of forced posing with a crew. This methodical approach ensures that every image reflects your true, relaxed self.
Posing for Business: Looking Authoritative and Approachable
However, being purely authoritative can sometimes feel cold or distant. The “Approachable Expert” look uses a subtle head tilt to soften a formal appearance. This small adjustment invites connection and builds trust with your audience, which is essential for modern networking. Your choice of attire also plays a critical role in your mental state. A high-quality corporate headshot singapore session relies on structured clothing, such as blazers or tailored shirts, to provide the visual weight necessary for professional branding. Avoid the “passport face”, that blank, static stare, by keeping your expression lively and engaged as if you are in the middle of a productive conversation.
The Professional Headshot Framework
You can follow these three steps to ensure every business portrait projects the right image for your personal brand:
- Step 1: Ground your feet shoulder-width apart. This creates a solid foundation and prevents you from swaying or looking off-balance.
- Step 2: Lean slightly toward the camera. This “interest lean” conveys engagement, energy, and a willingness to connect with the viewer.
- Step 3: Choose your smile level. A “closed-lip smirk” works well for traditional corporate environments, while a “full-access smile” is ideal for creative or people-centric roles.
Confidence for Milestone Portraits
Milestone photos require a blend of pride and personal warmth. When visiting a graduation photo studio singapore, the academic gown often adds bulk that can lead to poor posture. To combat this, keep your back straight and avoid sinking into the heavy fabric. If you’re coordinating with family members, maintain your individual focus while staying physically connected to your loved ones. This ensures the photo captures both your personal achievement and your support system without looking cluttered.
Ready to update your professional image? You can book a Corporate Headshot Package today to experience a streamlined, stress-free session that puts your best foot forward.
How to Prepare for a Stress-Free Shoot at PhotoNow
Preparation is the final bridge between understanding the theory of a great portrait and actually executing it. To truly master how to look confident in photos, you must align your physical energy with the technical skills you’ve learned. Start by choosing a time of day when you feel most energetic. If you are a morning person, booking an early session ensures you look vibrant and alert. Conversely, if you need time to hit your stride, an afternoon slot might be better suited to your natural rhythm.
A quick five-minute “Mirror Rehearsal” before you leave for the studio is a highly effective way to build muscle memory. Practice the specific technical cues from earlier sections, such as the “String Theory” posture and the “Squinch” for your eyes. This short practice session settles your nerves and makes the movements feel second nature once you are in front of the lens. You should also pack a small “confidence kit” to handle minor distractions. Include a comb, blotting paper to manage shine, and a spare shirt in case of unexpected wrinkles. These small tools provide peace of mind, allowing you to focus entirely on your presence rather than your appearance.
At PhotoNow, the professional studio environment is designed to handle the heavy lifting for you. High-quality lighting setups are pre-configured to flatter all angles, and the private setting at The Centrepoint ensures you can practice your poses without distractions. This “no-fuss” approach means you don’t need to worry about technical settings or lighting adjustments. You can simply step into the room and start creating.
Pre-Shoot Checklist
Your physical foundation plays a significant role in how “fresh” you appear on camera. Focus on hydration and rest in the 24 hours leading up to your session to ensure your skin looks its best. Arrival time is another critical factor. Rushing is the primary killer of confidence. Aim to arrive a few minutes early to settle in and catch your breath. Before the first click, perform a final 30-second scan in the mirror. Check for lint on your blazer, stray hairs, or any unwanted shine on your forehead. This final check ensures you feel polished and ready to go.
Making the Most of Your PhotoNow Session
Don’t expect your very first shot to be the winner. Use the first few minutes of your session for “warm-up” shots to get the initial nerves out of your system. Experiment with the variety of backdrops available to find the contrast that best complements your skin tone and wardrobe. Seeing yourself on the real-time monitors helps you refine your angles instantly. Book your private session at PhotoNow and practice your new confidence! By taking control of the timing and the environment, you ensure that every photograph reflects the authoritative and approachable professional you are.
Step Into Your Most Confident Self
Mastering how to look confident in photos is a journey that moves from understanding your own psychology to applying technical body language cues. You’ve learned that genuine confidence isn’t a genetic gift; it’s the result of a supportive environment and intentional posture. By utilizing private spaces to practice and choosing the right business stances, you can transform your professional image from stiff to truly authoritative. The right preparation ensures that your personality shines through without the distraction of performance anxiety.
Our private studio at The Centrepoint provides the perfect judgment-free zone to put these tips into practice. With professional lighting tailored for every skin tone and instant digital previews during your session, you can refine your look in real time. Ready to project your best self? Book a private session at PhotoNow today. It’s time to capture a portrait that reflects your professional value and personal pride. We look forward to helping you create images you’ll be excited to share.
Frequently Asked Questions
How can I look more confident in professional photos?
Focus on your posture and eye contact to project immediate authority. Using the “String Theory” method to lengthen your spine and the “Squinch” to add intensity to your gaze creates an immediate sense of assurance. These technical adjustments help you internalize how to look confident in photos while ensuring the camera captures a version of you that feels both capable, prepared, and approachable.
What should I do with my hands in a photoshoot?
Give your hands a specific task to perform rather than letting them hang aimlessly. You might lightly touch a blazer lapel, hold a professional prop like a tablet, or gently rest one hand on a hip. This prevents the “awkward dangle” and provides a natural anchor for your body; it helps you feel more grounded and relaxed throughout the entire session.
Is it better to smile with or without teeth for a headshot?
The choice depends on the specific image you want to project for your professional brand. A closed-lip smile often conveys a serious, authoritative presence; a smile with teeth feels more inviting and warm. Many professionals choose a “hybrid” approach, starting with a subtle smirk and moving to a full smile to capture a range of expressions for different marketing platforms.
How do I avoid a double chin in photos?
Use the “turtle” technique by pushing your chin slightly forward and down toward the camera lens. This movement stretches the skin under the jawline and creates a sharper, more defined profile. While it may feel unnatural during the shoot, the resulting image looks polished and professional; it effectively eliminates shadows that can create the appearance of a double chin.
What should I wear to look more confident?
Choose structured clothing that fits well and reflects your professional role. Solid, mid-tone colors like navy, charcoal, or deep green often work best under studio lighting. Avoid busy patterns that can distract from your face. When you wear clothes that make you feel powerful and comfortable, your body language naturally shifts to a more confident and relaxed state.
How do I stop my eyes from squinting or looking tired in pictures?
Relax your facial muscles by taking a deep breath just before the camera clicks. If you tend to squint, try looking away from the light source and then looking back toward the lens right before the shutter opens. This keeps your eyes fresh and alert; it prevents the “tired” look that often comes from holding a pose for too long.
Can a self-photo studio really help with camera shyness?
Yes, a private studio environment eliminates the pressure of being watched by a stranger. This privacy allows you to experiment with different poses and expressions without fear of judgment. Using a remote control to pace your own session gives you total control. This is a significant factor in learning how to look confident in photos for those who struggle with lens paralysis or performance anxiety.
How do I look more natural and less stiff?
Incorporate micro-movements and weight shifts into your posing routine to look more natural. Instead of standing perfectly still, shift your weight from one leg to the other or slightly adjust your shoulders between shots. This creates a sense of life and fluidity in the frame. Movement is the most effective way to break the “freeze” response and ensure your portraits look authentic and unforced.
Recent Comments