
What if the secret to a professional-grade portrait isn’t the high-end camera at all, but exactly what you carry in your bag? Most people assume a self-photo session is as simple as showing up and pressing a button. Then the reality of Singapore’s humidity hits, hair starts to frizz, and that effortless look feels impossible to achieve. It’s natural to feel stiff or unsure about your poses when there’s no photographer there to guide you. You’re likely wondering what to bring to a self photo studio to bridge the gap between a casual snap and a gallery-worthy masterpiece.
We understand that preparation is the key to a stress-free experience. This guide promises to strip away the guesswork by providing a definitive 2026 survival kit for your studio visit. You’ll discover how to pack for the heat, which props add value, and how to use provided options like traditional Hanbok rentals to elevate your session. We’ll walk through a curated list of physical items and digital prep that guarantee you walk away with professional-quality prints and the confidence of a seasoned model.
Key Takeaways
- Maximize your session by planning your shots in advance to ensure every minute of your private studio time is used effectively.
- Master what to bring to a self photo studio by prioritizing timeless wardrobe staples and layering techniques that offer multiple looks without a full outfit change.
- Reduce posing awkwardness with interactive props or specialized costume rentals like Hanbok to add professional depth and personality to your portraits.
- Streamline your creative process with a digital pose folder and the “Rule of Three” strategy to maintain a confident and steady rhythm.
- Pack a compact grooming and wardrobe survival kit to manage the humidity and keep your appearance polished for every single frame.
Why Preparation is the Secret to a Great Self-Photo Session
A self-photo studio provides a unique intersection where high-end professional equipment meets the total comfort of a private room. It is a space designed for those who want the quality of a fashion magazine shoot without the potential social anxiety of a stranger directing their every move. However, the difference between a gallery-worthy result and a set of awkward outtakes lies entirely in your preparation. While an impulse shoot might feel spontaneous, a prepared session allows you to move with purpose. Deciding exactly what to bring to a self photo studio before you arrive turns a simple 15-minute slot into a high-yield creative window. Think of your preparation as a “Studio Survival Kit,” which includes both your physical items and your mental roadmap for the session.
The Difference Between a Selfie and a Self-Portrait
A selfie is often a reactive moment captured on a mobile device, but a self-portrait is a deliberate piece of art. Looking back at the history of self-portraits, artists have always used tools to control their image. In a modern studio, professional DSLR cameras and calibrated lighting setups elevate your photos far beyond what a smartphone can achieve. You hold the remote shutter, which means you control the exact “vibe” and timing of every frame. This autonomy is powerful. Your choice of accessories and props, including the option for specialized costumes like Hanbok, dictates the narrative, moving the session from a casual hobby to a professional-grade portfolio.
Maximizing Your Studio Credits and Time
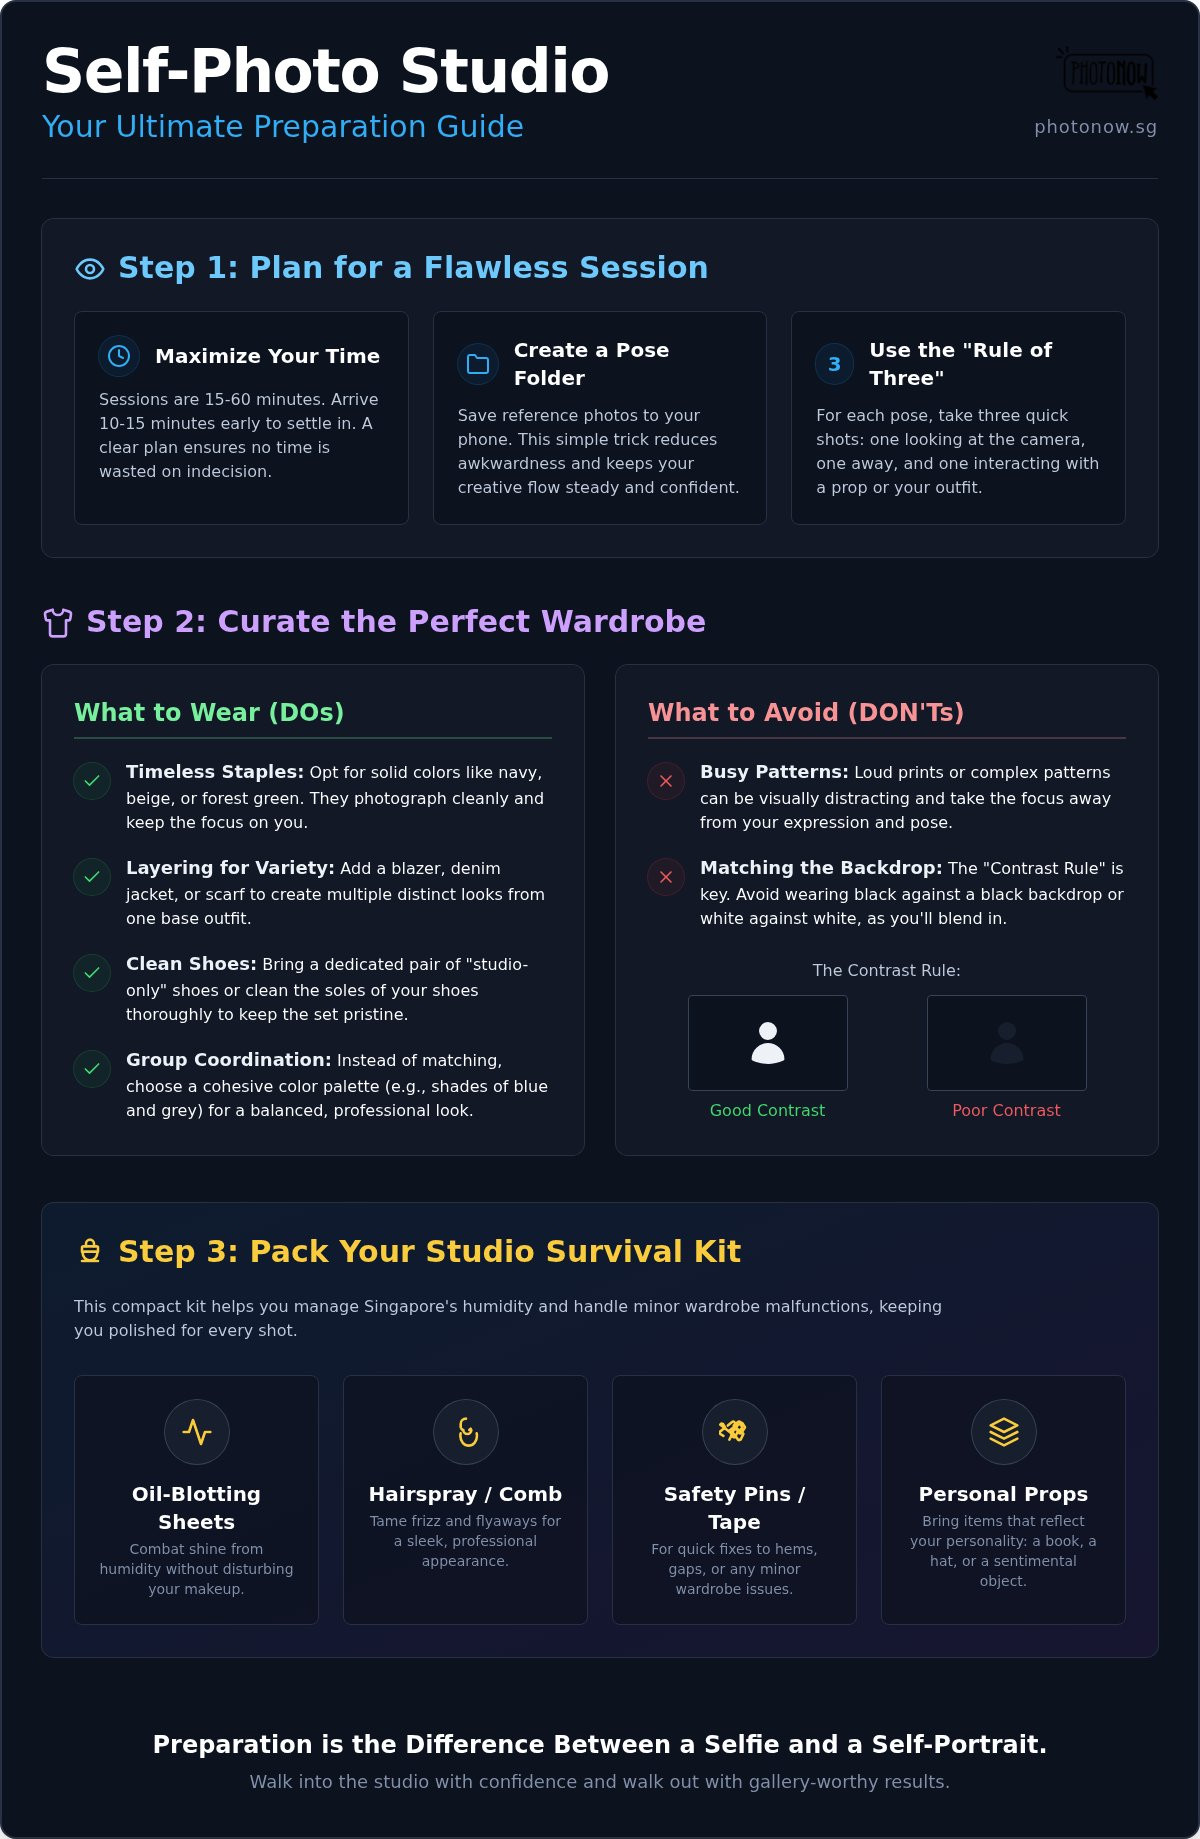
Most sessions in Singapore range from 15 to 60 minutes, which can pass surprisingly quickly once the lights are on. Arriving at the studio 10 or 15 minutes before your scheduled start is the first essential item on your checklist. This buffer allows you to settle in, check your hair, and review your plan. If you are curious about the technical setup, you can learn more about how does a self photo studio work? to feel more at ease. Having a clear strategy for what to bring to a self photo studio, such as pre-selected outfits or specific reference poses, ensures you aren’t wasting precious minutes of studio credit on indecision. Efficiency is the key to a stress-free experience that yields dozens of usable shots.
The Essential Wardrobe: What to Wear for Your Shoot
Selecting the right attire is perhaps the most influential decision you’ll make when deciding what to bring to a self photo studio. While trendy pieces are fun, timeless choices often provide the best long-term value. Solid colors, such as navy, beige, or forest green, tend to photograph more cleanly than busy patterns that can distract the eye. If you’re aiming for variety without the hassle of a full outfit change, use the layering strategy. By simply adding a structured blazer, a denim jacket, or a lightweight scarf, you can transform a single base outfit into three distinct looks. This approach keeps your session moving quickly and ensures you maximize your allotted time.
Don’t forget that your shoes are part of the frame. In a professional studio environment, the floors are often pristine; dirty soles can leave marks that are difficult to edit out later. We recommend cleaning your soles thoroughly or bringing a pair of “studio-only” shoes to change into once you arrive. For those coming in groups, coordination is better than matching. Rather than everyone wearing identical white t-shirts, try a cohesive color palette. Let one person wear a soft blue, another a navy, and a third a neutral grey. This creates a balanced, professional aesthetic that feels intentional rather than forced.
Adapting to the Studio Background
The success of your portrait often depends on how well you interact with the environment. Most locations offer classic backdrops like white, grey, black, or beige. Following the “Contrast Rule” is vital. If you’ve chosen a black background for a moody, high-contrast look, avoid wearing solid black clothing unless you want to blend into the shadows. You can check out our professional studio setups to help visualize which colors will pop best against our specific backdrops. If you want to skip the wardrobe stress entirely, you might even consider renting a traditional Hanbok to add a unique cultural flair to your session.
Grooming for the Singapore Climate
Singapore’s humidity is a constant factor that can quickly undo your morning grooming routine. When planning what to bring to a self photo studio, prioritize items that keep you looking fresh despite the heat. Oil-blotting sheets and travel-sized hairspray are essential for taming frizz and managing shine. Professional studio lights are powerful; they tend to emphasize oily skin. Using matte makeup rather than a dewy finish will result in a much more polished final image. For a more comprehensive photoshoot checklist, consider how small tools like a lint roller or safety pins can save a session from minor wardrobe malfunctions. Preparing these small details ensures your private studio session feels effortless and professional, allowing you to focus entirely on your expressions once the timer starts.
Creative Props and Costume Integration
While many studios provide basic furniture or stools, bringing your own items is the most effective way to personalize your session. When you are deciding what to bring to a self photo studio, think about items that represent your specific milestones. Musical instruments, graduation caps, or even ultrasound photos for a maternity shoot add significant emotional depth. These aren’t just objects; they are storytelling tools that make your portraits unique to your life stage. Bringing a personal item ensures your photos feel like a reflection of your personality rather than a generic studio session.
Beyond sentiment, interactive props serve a practical purpose for those who feel camera-shy. Many people feel a sudden sense of stiffness once they step in front of the lens. Holding a bouquet of flowers or adjusting a pair of sunglasses gives your hands a task, which instantly reduces awkwardness. Even a simple coffee cup or a book can provide a natural point of focus, allowing for candid, lifestyle-style shots that feel authentic. If you’re visiting a pet-friendly studio, don’t forget to pack high-value treats and a favorite squeaky toy to keep your furry friend engaged and looking at the camera.
Utilizing In-Studio Costume Rentals
One of the best ways to elevate your shoot without overpacking is to utilize on-site rentals. Carrying bulky traditional wear across Orchard Road can be a hassle and may result in unwanted wrinkles. Instead, you can find traditional Hanbok rentals in Singapore directly within the studio. This provides a professional, high-end look with minimal effort. To make the most of these rentals, follow standard outfit tips for your photoshoot by choosing a neutral base layer, like a fitted tank top or leggings. This allows for quick transitions into the costume without needing to spend half your session in a changing room.
Props for Different Occasions
Different milestones require specific additions to your checklist. Knowing what to bring to a self photo studio for these events ensures your final prints are both accurate and polished. Consider these tailored suggestions:
- Graduation: Bring your own faculty hood or specific medals to ensure accuracy, even if the studio provides a general gown. You can find more details in our guide to graduation photoshoot essentials.
- Corporate: Subtle props like a sleek tablet, a leather-bound notebook, or a pair of professional glasses can help create a “working” look that feels approachable yet authoritative.
- Maternity: Small baby shoes or a knit blanket can provide a gentle, heartwarming focus for your poses.
Planning these creative additions beforehand allows you to move through your session with a clear sense of purpose. By mixing your personal items with professional studio rentals, you create a diverse gallery of images that serve multiple purposes, from social media updates to formal keepsakes.
Digital Prep: Poses, Mood Boards, and References
While physical items like outfits and props are vital, digital preparation is often the deciding factor in how professional your results look. Your phone is a tool. When considering what to bring to a self photo studio, your device should be your most valuable asset. It acts as your visual roadmap throughout the session. Instead of scrolling through social media during your session, have a dedicated album of 10-15 screenshots ready for immediate viewing. This prevents the mid-shoot “blank” that often happens when the timer is running.
For groups or couples, building a mood board on Pinterest is a fantastic way to align on a specific vibe. Whether you want high-fashion editorial shots or bright, playful family portraits, having a shared reference ensures everyone is on the same page. This saves you from lengthy discussions during your session. To keep the rhythm fast, adopt the “Rule of Three.” Have three go-to poses ready for every outfit change. This maintains your momentum and ensures you leave with a diverse gallery of shots.
Mastering the remote shutter is another digital skill that pays off. We recommend the “click and hide” technique. Press the button and immediately tuck the remote behind your back or into a pocket. This keeps the focus on your silhouette rather than the equipment. If you are feeling nervous about the process, remember that you are in a private space designed for experimentation. Ready to put your poses to the test? Book your private studio session today and create your own professional gallery.
Top 3 Poses for Every Self-Photo Beginner
If you are unsure where to start, these three poses are reliable and flattering for almost everyone:
- The Candid Laugh: Look away from the lens and think of something genuinely funny. The motion of a slight laugh creates natural facial muscle engagement that looks better than a forced smile.
- The Profile Lean: Sit on a studio chair or stool at a 45-degree angle to the camera. Lean slightly forward toward the lens to create depth and a defined jawline.
- The Dynamic Walk: Take small, slow steps toward or away from the camera. This sense of motion adds a lifestyle element to your portraits that feels modern and authentic.
Managing Your Digital Files
Before you arrive, check the studio’s digital policy. Some packages include all raw files, while others focus on a set number of selected prints. While you can bring a high-speed thumb drive, most modern studios in 2026 use QR codes or direct email links for instant downloads. Understanding these logistics is a key part of what to bring to a self photo studio prep. For more advice on navigating your visit, see the definitive guide to the best self photo studio experience in Singapore. Having your digital storage ready ensures you don’t lose a single memory from your session.
The Final ‘Studio Survival Kit’ Checklist
The final layer of your preparation involves the small, practical tools that handle unexpected distractions. When finalizing your list of what to bring to a self photo studio, think of these items as your insurance policy for a flawless gallery. Your grooming kit should prioritize shine control and detail. Blotting paper is essential to manage the effects of professional studio flash on oily skin, while a hairbrush and lip balm ensure you stay polished throughout the session. A small hand mirror allows for quick checks between poses without needing to leave your private room.
Wardrobe malfunctions are rare, but they can eat into your session time if you aren’t prepared. A lint roller is a non-negotiable item, especially if you’ve chosen dark, timeless colors that tend to attract dust. Safety pins can help adjust a fit in seconds, and carrying a ‘backup’ outfit provides peace of mind in case of a spill or a sudden change in creative direction. For logistics, keep your booking confirmation handy on your phone and bring a dedicated tote bag to keep your personal belongings organized. Don’t forget a hard-folder or a stiff envelope; this protects your physical prints from bending or creasing during your journey home.
The 60-Minute Countdown
A successful session starts long before the first click of the remote. Following a simple timeline helps you arrive in a calm, creative state of mind. Use this countdown to stay on track:
- T-minus 60: Complete your final hydration and a thorough hair check. This is the best time to apply your base matte makeup.
- T-minus 30: Begin your travel to Orchard Road. Aiming for The Centrepoint ensures you have a buffer for traffic or transit delays.
- T-minus 10: Check-in at the studio. Use these final minutes to browse the available props, settle your belongings, and take a few deep breaths.
Why Choose PhotoNow for Your Singapore Session?
PhotoNow acts as a professional facilitator, providing the high-end backdrop you need for your prepared ideas. Located conveniently at The Centrepoint, our studio offers total privacy in rooms equipped with professional lighting and DSLR setups. This ensures that your session results in high-value prints, whether you’re capturing Family Portraits or updating your professional image with Corporate Headshots. We’ve anticipated your needs by offering on-site costume rentals and a seamless, no-fuss experience. Ready to see the results of your preparation? Book your session at PhotoNow today! and enjoy a studio experience designed for consistent, professional results.
Elevate Your Portraits with Purposeful Preparation
Success in a self-photo session isn’t about technical expertise; it’s about the intention you bring into the room. By curating a Studio Survival Kit and mastering your digital pose library, you transform a brief session into a high-yield creative experience. Preparation ensures that you spend your time experimenting with angles and expressions rather than worrying about grooming or wardrobe malfunctions. Knowing exactly what to bring to a self photo studio allows you to focus on the narrative of your shoot, resulting in professional-grade portraits that feel authentic and polished.
PhotoNow provides the ideal environment for your prepared ideas, offering high-end DSLR setups and professional studio lighting in the heart of Orchard Road. Our private rooms at The Centrepoint give you total comfort, while our traditional Hanbok rentals add a specialized touch to your gallery. Whether you’re capturing a milestone or updating your portfolio, we’re here to facilitate a seamless, no-fuss experience. Book your private session at PhotoNow Singapore today and watch your vision come to life. We look forward to seeing the stunning results of your preparation.
Frequently Asked Questions
Do I need to bring my own camera to a self-photo studio?
No, you don’t need to bring any photography equipment. PhotoNow provides a professional DSLR setup and calibrated studio lighting to ensure high-quality results. Each private room is fully equipped with a remote shutter, giving you complete control over the timing of every shot. This professional environment allows you to focus entirely on your expressions and poses without worrying about technical settings or camera gear.
How many outfits should I bring for a 15-minute session?
We recommend bringing no more than two outfits for a 15-minute slot. Time moves quickly once the session begins, and frequent changes can eat into your actual shooting time. A smart strategy for what to bring to a self photo studio is to use layering. By adding or removing a jacket or scarf, you can create the illusion of multiple looks without needing to spend time in a changing area.
Should I wear makeup for a self-photo session?
Yes, wearing makeup is recommended to enhance your features under professional studio lights. However, it’s best to choose matte products over dewy finishes. Studio flash can emphasize skin oils, so a matte base helps maintain a polished look. Given Singapore’s humidity, packing oil-blotting sheets in your survival kit is a practical way to manage shine throughout your private session and keep your appearance fresh.
Can I bring my pet to the studio?
Many studios allow pets, but you should always verify the specific pet policy during the booking process. If you do bring a furry friend, remember to include high-value treats and a favorite toy in your bag. These items help keep your pet engaged and looking toward the lens. Ensuring your pet is comfortable is the key to capturing those heartwarming, candid family moments during your session.
Is there a place to change clothes at the studio?
Yes, PhotoNow provides private rooms where you can comfortably change your attire. These spaces are designed for total privacy, allowing you to transition between looks with ease. Having a dedicated area to freshen up ensures your experience remains stress-free and efficient. If you’re planning a themed shoot, our on-site Hanbok rentals are also available to save you from carrying bulky costumes through Orchard Road.
What happens if I don’t know how to pose?
It’s completely natural to feel unsure about posing at first. This is why digital preparation is so valuable. We suggest saving a folder of reference poses on your phone before you arrive at the studio. You can also use provided furniture like chairs or stools to create natural angles. The privacy of the room allows you to experiment freely until you find the most flattering positions for your silhouette.
Are props provided or must I bring my own?
PhotoNow provides a selection of basic props, but bringing your own items adds a unique personal touch to your gallery. When deciding what to bring to a self photo studio, consider items that tell your story, such as graduation caps or musical instruments. We also offer specialized costume rentals, including traditional Hanbok, to help you achieve a specific aesthetic without the need to purchase or transport your own garments.
How do I receive my photos after the session?
You’ll typically receive your digital files via a QR code or a direct email link shortly after your session concludes. This modern delivery system ensures you can access and share your professional-grade portraits almost immediately. Some packages also include physical prints, which are processed on-site. We recommend bringing a stiff folder or envelope to protect these prints from bending as you continue your day at The Centrepoint.
Recent Comments