What if the secret to a flawless portrait isn’t a professional photographer behind the lens, but the freedom to be yourself when no one is watching? Many people arrive at a studio feeling stiff or worrying they’ll look unphotogenic the moment the timer starts. It’s natural to feel a bit of pressure when you’re managing the remote shutter and the clock at the same time. This guide offers practical self photography studio tips for beginners to help you master the art of the self-portrait. You’ll learn how to prepare effectively, pose with confidence, and maximize your studio time for high-quality results.
Professional self-photography is less about technical mastery and more about creative play within a high-end, structured environment. We’ll cover everything from outfit choices to technical basics to ensure your first session in Singapore is a seamless, stress-free experience. By the end of this article, you’ll feel like a capable facilitator of your own image; you’ll be ready to capture milestones or social media content with total ease and professional polish. We’ve anticipated your needs so you can focus on the fun of the shoot rather than the mechanics of the camera.
Key Takeaways
- Master the art of studio preparation by choosing the right colors and makeup to ensure your portraits look professional under high-end lighting.
- Explore essential self photography studio tips for beginners that help you navigate the remote shutter and focus settings with complete confidence.
- Implement simple posing techniques, such as micro-movements and the 45-degree rule, to create variety and flatter your silhouette in every shot.
- Learn how the privacy of a self-photo studio allows for more authentic expressions and a relaxed, fun experience with friends or family.
- Gain insights into maximizing your session time so you walk away with a full collection of high-quality digital files without any unnecessary stress.
What to Expect: The Beginner’s Guide to Self-Photography Studios
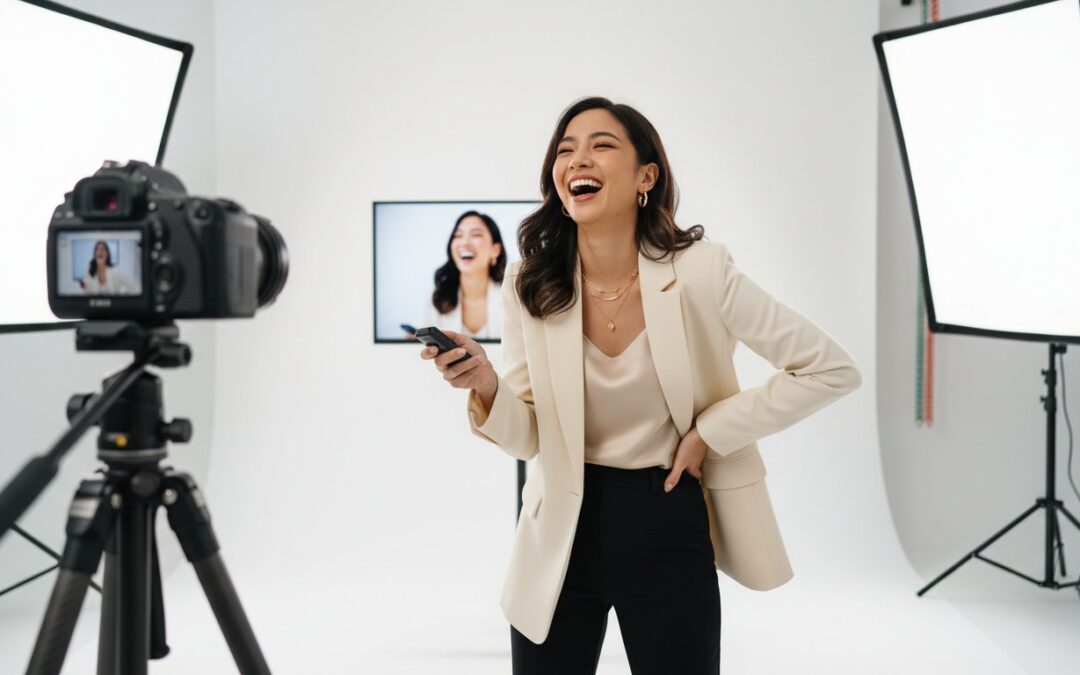
A self-photography studio is a private, professional sanctuary designed to give you high-end results without the pressure of a traditional photoshoot. Unlike a home setup where you might struggle with shaky tripods or poor lighting, these spaces come pre-equipped with high-end DSLR cameras and calibrated studio strobes. You hold the remote shutter, which puts you in total command of the session. This modern approach builds upon the long history of self-portraits, allowing you to become both the artist and the subject in a controlled, high-quality environment.
The biggest draw for many is the privacy factor. One of the most important self photography studio tips for beginners is to embrace the solitude of the room. When you remove the photographer from the equation, the barrier of “camera shyness” often disappears. You’re free to experiment with bold expressions, candid laughter, or intimate poses that might feel forced if someone else were watching. This privacy is why these studios produce such authentic, relaxed results that look far more natural than a standard portrait session.
You won’t have to guess how your photos are turning out. Every booth is equipped with a “Live View” monitor that acts as a high-definition digital mirror. You can see your posture, hair, and framing in real-time, making it easy to adjust your look before you click the shutter. This instant feedback loop is a massive advantage for those who worry about how they appear on camera. The session flow is typically very efficient; after a quick check-in and prop selection, you’ll have a dedicated 15-minute block to shoot, followed by a relaxed photo selection process at a digital kiosk.
Why Choose a Studio Over a Smartphone?
While smartphone cameras are impressive, they can’t replicate the depth and clarity of a professional DSLR sensor. Studio lighting provides a consistent, flattering glow that masks imperfections and highlights your best features, whereas natural light in Singapore can be unpredictable or harsh. Being in a dedicated creative space also provides a psychological boost, helping you feel more “in the zone” than you would taking selfies at home.
Common Misconceptions for First-Timers
Many beginners worry they need to be tech-savvy to manage the equipment. In reality, the studio team handles all the technical calibrations before you enter; your only responsibility is to press a single button. Another common myth is that you need professional posing skills to look good. Because the monitor shows you exactly what the camera sees, finding your best angles becomes an intuitive, playful process rather than a technical challenge.
Pre-Session Planning: Outfits, Makeup, and Concepts
Preparation is the key to transforming a standard session into a gallery-worthy collection of images. When considering self photography studio tips for beginners, your wardrobe choice is perhaps the most impactful factor. Solid colors typically work best under professional strobes because they keep the focus on your face and expressions. Busy patterns or tiny stripes can sometimes create a distracting visual effect on digital sensors, so it’s safer to stick to clean, bold textures. If you’re planning a graduation session or a corporate headshot, ensure your clothes are pressed; the high-resolution cameras will pick up every detail, from the crispness of a collar to the drape of a gown.
Makeup for the camera differs significantly from your daily routine. Studio lights are powerful and can wash out subtle colors, so you might want to apply your blush or lipstick slightly more vibrantly than usual. A critical rule for studio sessions is to avoid foundations or powders with high SPF. These products often contain ingredients that cause a white “flashback” under bright lights, leaving your skin looking unnaturally pale in the final files. Integrating fundamental photography tips regarding light and shadow will help you understand why a matte finish is generally preferred over a very dewy look, as it prevents unwanted glare on the forehead or nose.
Coordinating Outfits for Groups
If you’re booking a session with friends or family, avoid the cliché of identical matching shirts. Instead, aim for a cohesive color family like muted earth tones, soft pastels, or varying shades of blue. This creates a visually harmonious look that feels modern and sophisticated. Be mindful of the studio backdrop; wearing a black suit against a dark background can lead to a “floating head” effect. Ensure there is enough contrast to define your silhouette. Bringing a quick change of shoes or a simple accessory like a jacket can effectively double the variety of your portfolio without wasting precious minutes. Planning these details in advance ensures your session at a professional studio is productive and fun from the very first click.
The Power of the Pinterest Board
Creating a “mood board” with 5 to 10 go-to images on your phone is a brilliant strategy to beat session anxiety. Search for terms like “self-photo studio poses” to find silhouettes that work for your specific body type. Pay close attention to hand placements in your reference photos. Most people feel awkward when they don’t know what to do with their hands, so having a few planned moves; like tucking a hand into a pocket or resting it on a prop; can make you look instantly more relaxed and confident.

Mastering the Studio Equipment as a Beginner
Stepping into a professional booth for the first time can feel intimidating, but the equipment is designed to be your silent partner. The most important tool you’ll handle is the remote shutter. Many first-timers don’t realize that these remotes often feature a two-stage button. A gentle half-press allows the camera to lock its focus on your eyes; a full click then captures the shot. Mastering this rhythm is one of the most effective self photography studio tips for beginners, as it ensures every frame is crisp and sharp. If you click too quickly without letting the lens focus, you might end up with soft images that lose that professional edge.
While the remote is your control center, you don’t always want it to be the star of the photo. To achieve a more natural, “candid” look, you’ll need to get creative with how you hide the trigger. You can tuck it behind your back, conceal it in a pocket, or even hide it under a fold of your clothing. If you’re using props, try masking the remote inside a bouquet of flowers or behind a book. These small adjustments transform a “selfie” into a high-end portrait that looks like it was taken by a seasoned professional. It’s all about maintaining the illusion of effortless grace while staying in total command of the technology.
The monitor in front of you provides a continuous feedback loop, but it’s vital to use it correctly. Think of the screen as a quick reference point rather than a mirror to stare at. Glance at it to check your hair or posture, then immediately bring your eyes back to the camera lens. This ensures you’re engaging with the viewer rather than looking slightly off-camera. This balance of using technology without being distracted by it is what separates a great session from a mediocre one.
How to Work with Studio Lighting
Professional studios are calibrated with a “sweet spot” where the light is most flattering. This area is usually marked on the floor; staying within this zone ensures the strobes wrap around your features evenly. One common mistake is standing too close to the backdrop. Unless you want a dramatic, high-contrast shadow, try to stay a few feet away from the wall. This creates a sense of depth and prevents harsh silhouettes from distracting from your face.
Creative Use of Studio Props
Props aren’t just for decoration; they’re functional tools that help anchor your body. If you feel stiff, sitting on a stool or leaning against a high chair can give your limbs a natural place to rest. For group shots, using stools of different heights creates a dynamic composition that looks organized and polished. Simple items like a pair of glasses or a vintage camera give your hands a “task” to perform, which instantly melts away camera shyness and results in more authentic expressions.
5 Posing Strategies to Beat Camera Shyness
Feeling a bit stiff in front of the lens is a common hurdle for most first-timers. One of the most effective self photography studio tips for beginners is to utilize the “Micro-Movement” technique. Instead of holding a rigid pose, make tiny adjustments between every click of the shutter. Tilt your chin slightly, shift your weight from one leg to the other, or adjust your sleeve. These small variations ensure you walk away with a diverse gallery rather than fifty identical shots. To create a more dynamic and flattering silhouette, remember the 45-degree rule; simply angle your body away from the camera rather than facing it head-on. This creates depth and a more polished, editorial look in your final portraits.
If you’re aiming for a moody or professional feel, try the “Look Away” method. By capturing your profile or looking down at your hands, you create a sense of mystery and candidness that feels less like a staged photo and more like a captured moment. For those in a group, focus on interaction over posing. Looking at your partner or laughing with your friends creates authentic expressions that no amount of “saying cheese” can replicate. If you find yourself over-analyzing the monitor, try closing your eyes for a second, taking a breath, and opening them just as you click the remote. This resets your facial muscles and results in a more relaxed, natural appearance.
Structured “spamming” is a great way to capture movement, but it needs a plan. Instead of just clicking randomly, perform a specific action like a hair flip or a slow walk toward the lens while hitting the shutter button rapidly. This increases your chances of catching that perfect, mid-motion frame where your expression is genuine and your hair looks effortless. It’s a fun way to end your session on a high-energy note. Ready to put these movements into practice? You can book your private session today and start experimenting with these professional techniques in total privacy.
Posing for Solo Portraits
For solo shots, the “Triangle” method is your best friend. Create angles with your body by placing a hand on your hip, crossing your legs, or resting an elbow on a prop. These triangles add visual interest and keep your posture from looking flat. Vary your eye contact by looking directly at the lens for a bold portrait, then at the monitor to check your alignment, and finally off-camera to create a thoughtful, candid vibe.
Group and Family Dynamics
Professional group photos rely on layering. Rather than standing in a straight line, have some members sit on stools while others stand behind them. This creates a more sophisticated composition. If the group feels stiff, try the “Laughter” trick; have everyone fake a loud, ridiculous laugh. The sheer absurdity usually triggers real laughter within seconds, which is the perfect moment to start clicking the shutter.
Managing Your Time: The 15-Minute Roadmap
Maximizing a standard 15-minute window requires a bit of strategy. Use this roadmap to stay on track:
- Minutes 1-5: Warm-up. Take test shots to get comfortable with the remote and ensure you’re standing in the lighting “sweet spot” mentioned earlier.
- Minutes 5-12: Core Poses. This is your time for the “must-have” shots, including graduation portraits, corporate headshots, or family groupings. If you have a prop or accessory change, do it now.
- Minutes 13-15: High-Energy Candids. Use the final minutes for your “spam” strategy. Jump, dance, or move around to capture those fun, unscripted memories that often become personal favorites.
Elevate Your Experience with PhotoNow
PhotoNow stands as a premier destination for those seeking a high-quality, private photography experience in Singapore. By combining professional-grade DSLR cameras with a welcoming atmosphere, we ensure that the technical barriers are removed. This allows you to focus entirely on the creative process. If you follow the self photography studio tips for beginners discussed in this guide, our studio provides the perfect environment to execute them. Whether you’re here for a Corporate Headshot Package or a fun session with friends, the result is always a set of crisp, high-resolution digital files that meet professional standards.
The equipment in our booths isn’t just standard; it’s calibrated for the specific lighting conditions of our space. This means your skin tones look natural and your outfits pop against our chosen backdrops. We’ve anticipated the common pains of first-timers, such as worrying about running out of time, by creating a logical and fast-paced workflow. From the moment you check in to the final photo selection at our digital kiosks, the process is methodical and stress-free. This reliability is why we’re a preferred choice for those looking for a high-end result without the typical pressure of a photographer-led session.
The Hanbok Experience: A Unique Studio Offering
One of our most popular offerings is the Hanbok Rental for photoshoots. This adds a unique cultural and aesthetic flair to your portraits that is hard to find elsewhere. When wearing traditional attire, it’s helpful to adapt your posing to highlight the garment’s elegance. Traditional garments like the Hanbok require a different approach than modern streetwear. The volume of the skirt and the structure of the top mean that smaller, more deliberate movements work best. Instead of high-energy shots, try slow, graceful pivots. This allows the camera to capture the intricate details of the embroidery. For more detailed advice on making the most of your time, check out The Definitive Guide to the Best Self Photo Studio Experience in Singapore.
Booking Your First Session
Starting your journey is straightforward through our online booking system. We cater to diverse needs, from individual Basic Self-Photo Packages to large Family Portrait sessions. Our basic package is designed for efficiency; it provides you with dedicated studio time, physical prints, and all your digital copies. We also offer specialized services like our Graduation Photography Package and Maternity photoshoot options to help you celebrate life’s biggest milestones. Whether you need a passport & visa photoshoot or a comprehensive pre wedding photo shoot, our studio environment is organized to handle your requirements with poise. We respect your time and focus on providing a straightforward experience that results in high-quality memories. If you’re ready to create professional-grade portraits, Book your stress-free self-photo session at PhotoNow today!
Ready to Capture Your Best Self?
Mastering a self-portrait session is about more than just clicking a button; it’s about the preparation and confidence you bring into the booth. You’ve learned how to coordinate your wardrobe, manage the remote shutter, and use micro-movements to create a diverse set of images. These self photography studio tips for beginners are designed to ensure your first experience in Singapore is both fun and productive. By focusing on simple posing strategies and utilizing real-time monitor feedback, you’ll walk away with professional-grade results that feel authentic to who you are.
Our studio provides a private and stress-free environment equipped with a professional DSLR and lighting setup to guarantee crisp detail in every shot. Whether you’re interested in our optional Hanbok rentals or specialized themed packages, we make the process seamless and efficient. It’s time to put your new skills into practice and create memories that last. Book Your Private Self-Photo Session at PhotoNow today and discover how easy it is to achieve high-quality portraits on your own terms. We can’t wait to see the stunning results you’ll create.
Frequently Asked Questions
What should I wear to my first self-photo studio session?
You should wear solid, neutral colors that contrast with the studio backdrop to avoid a “floating head” effect. While we’ve discussed general color palettes, it’s also smart to consider the specific purpose of your shoot, such as a Corporate Headshot Package or a Graduation Photography Package. Bringing a change of shoes or a simple layer like a blazer can effectively double your look variety within the same session without requiring extra time.
How many people can I bring for a basic self-photo package?
Our Basic Self-Photo Package typically accommodates up to five people in a regular studio room. If you’re planning a larger gathering, we offer rooms that can comfortably hold up to twelve individuals. This flexibility makes it an ideal choice for a fun group session with friends or a more intimate Family Portrait Package. We recommend checking your specific booking details to ensure the space fits your group size perfectly before you arrive.
Do I need to have photography experience to use the studio?
No previous photography experience is required because our studio is designed for complete simplicity. All the technical settings, including lighting and camera focus, are calibrated by our team before you start. You simply use the remote shutter to capture your shots while watching yourself on the live monitor. These self photography studio tips for beginners are all you need to achieve professional results without any technical stress or complicated camera knowledge.
Can I bring my own props or pets to the session?
You are welcome to bring your own props to personalize your session, from graduation gowns to meaningful personal items. While we provide a variety of stools and basic accessories, bringing your own items helps create a unique concept. Regarding pets, it is best to check our current studio policy before booking to ensure we can accommodate your furry friends in a way that maintains our high standards of cleanliness for all our clients.
How long does a typical self-photography session last?
A standard session typically lasts between 15 and 45 minutes depending on the package you select. Our Basic Self-Photo Package often starts with a 15-minute shooting block, which is plenty of time to capture dozens of high-quality images. We also offer longer sessions for more complex needs, such as a Maternity photoshoot or a pre wedding photo shoot, where you might want more time for multiple outfit changes or different group combinations.
Is the studio completely private while I am taking photos?
Yes, the studio room is completely private during your session to ensure you feel relaxed and unobserved. There are no photographers or staff members inside the booth while you are shooting, which is why many clients find it easier to express themselves authentically. This privacy is a core part of the experience, allowing you to experiment with poses and expressions without any external pressure, judgment, or the technical self-importance of a traditional session.
When will I receive my digital photos and physical prints?
You will typically receive your printed photos immediately after your session ends, and digital copies are often provided on the same day. Our streamlined process includes a digital selection kiosk where you can pick your favorite shots for printing right away. This efficiency ensures you don’t have to wait weeks for your results, making it a convenient option for last-minute milestones, passport & visa photoshoot requirements, or quick social media updates.
What happens if I don’t know how to pose during my time slot?
If you’re unsure how to pose, the “Live View” monitor acts as a digital mirror to guide your movements in real-time. You can immediately see what works and what doesn’t, making the process intuitive even for first-timers. Following our self photography studio tips for beginners, such as the 45-degree rule or the “Triangle” method, will give you a solid foundation to start your session with total confidence and professional results.
Recent Comments